
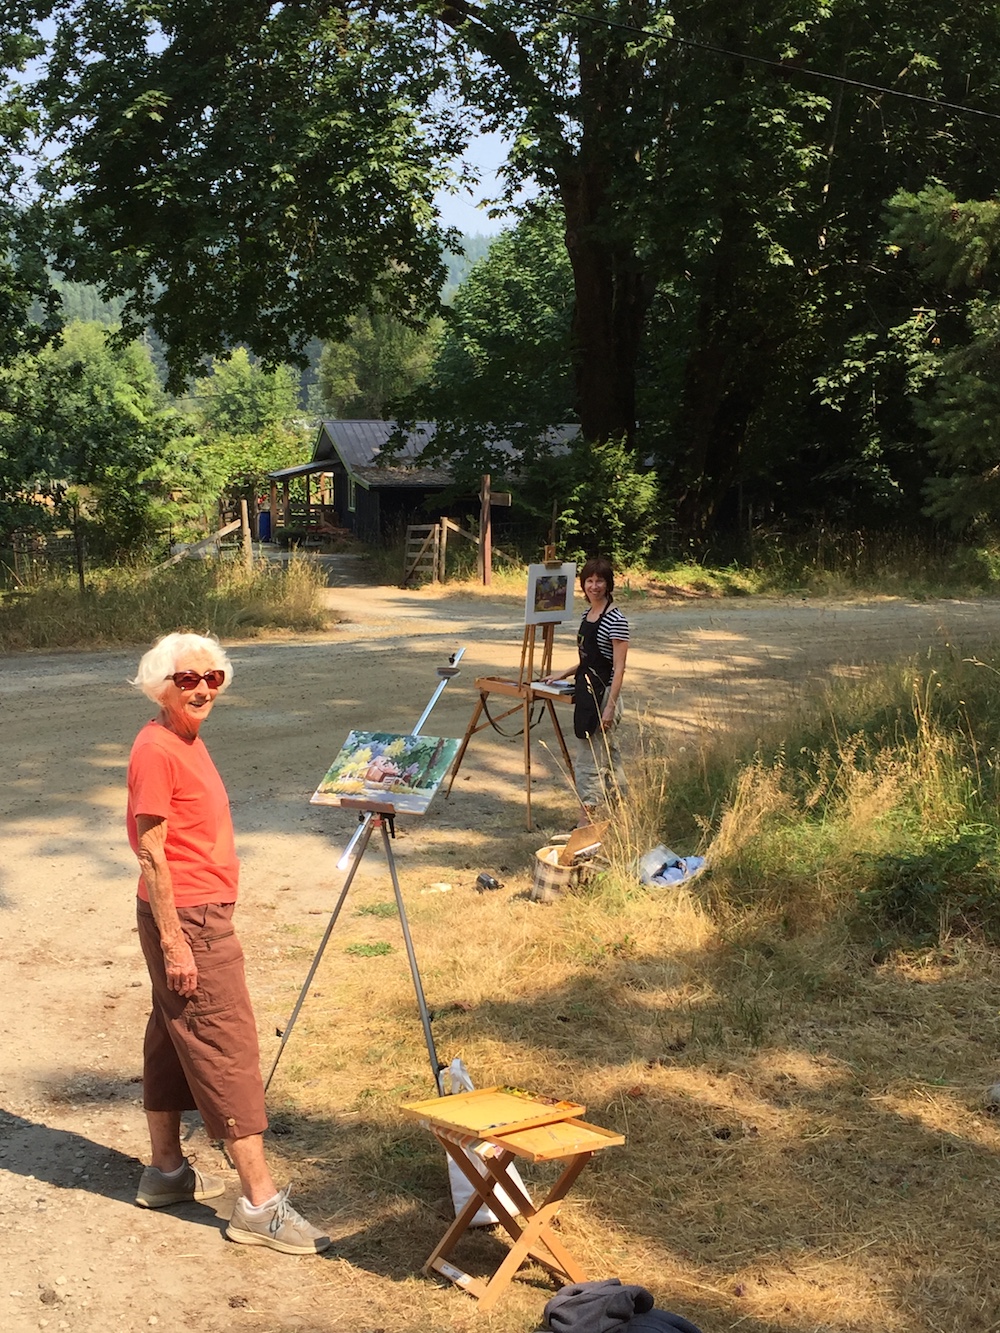
A couple days ago I was on Salt Spring Island visiting my parents and one of the things I really wanted to do while there was to work en plein air. It’s been awhile since I’ve painted on location and as I’m preparing for my workshop in Croatia, this was on the to-do list. It was a perfect day for painting and although I went through the angst of I-can’t-remember-how-to-paint during the process, I was quite happy with the result. Of course the outcome wasn’t as important as the doing of it but still, it’s nice to have some success. This post reveals my thoughts on tweaking my plein air painting back in the studio as well as the progress of the painting on location.
Pastelling En Plein Air
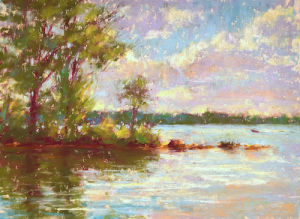
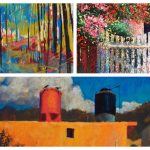
First the scene:
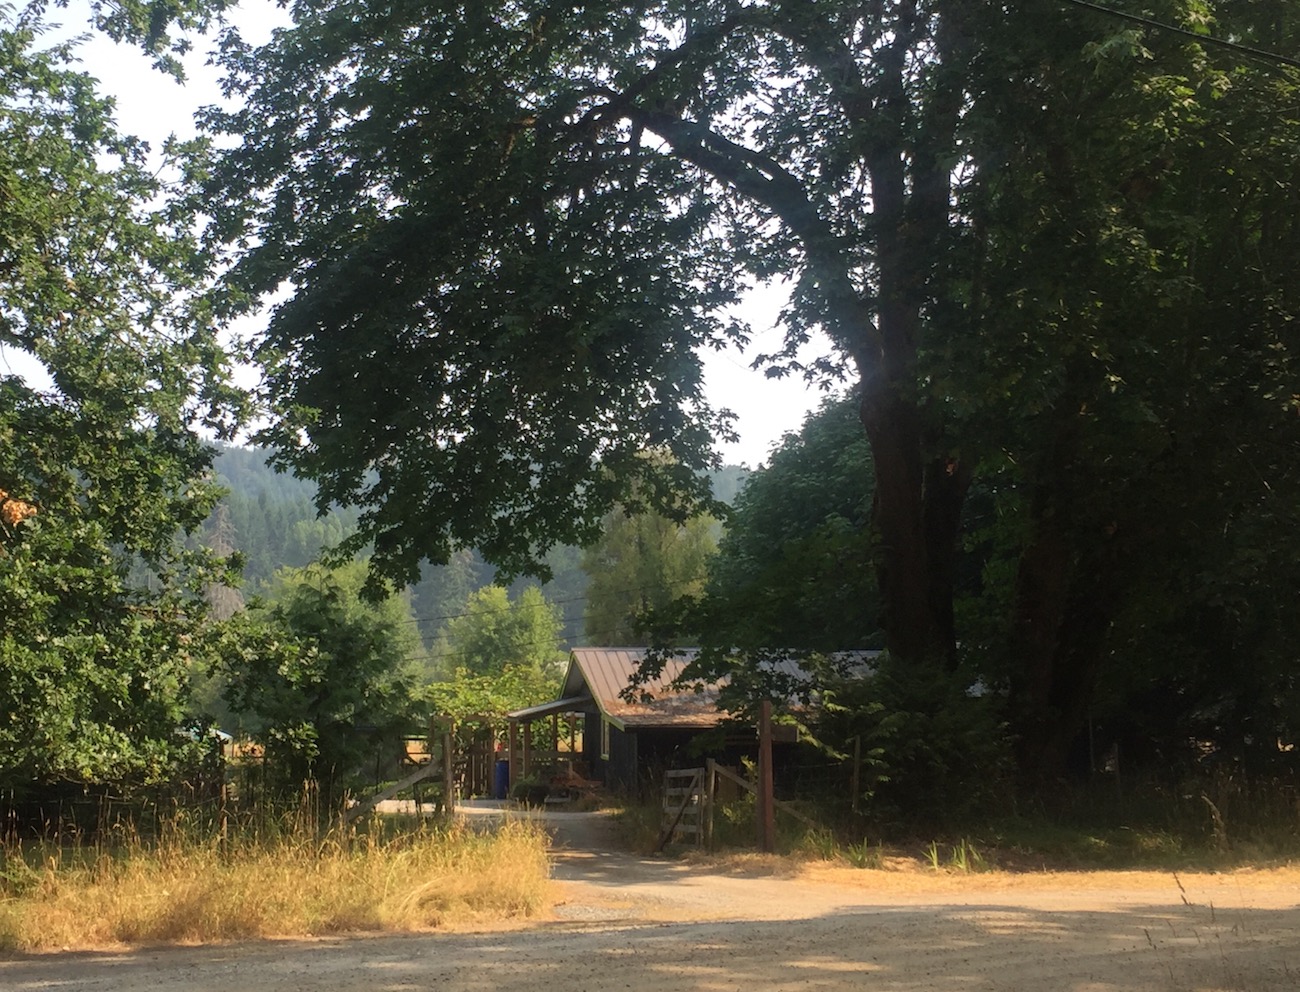
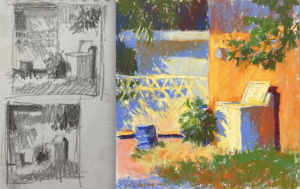
This whole scene caught my eye. But I needed to decided what was the thing that most stopped me to paint. That’s where the thumbnail came in…
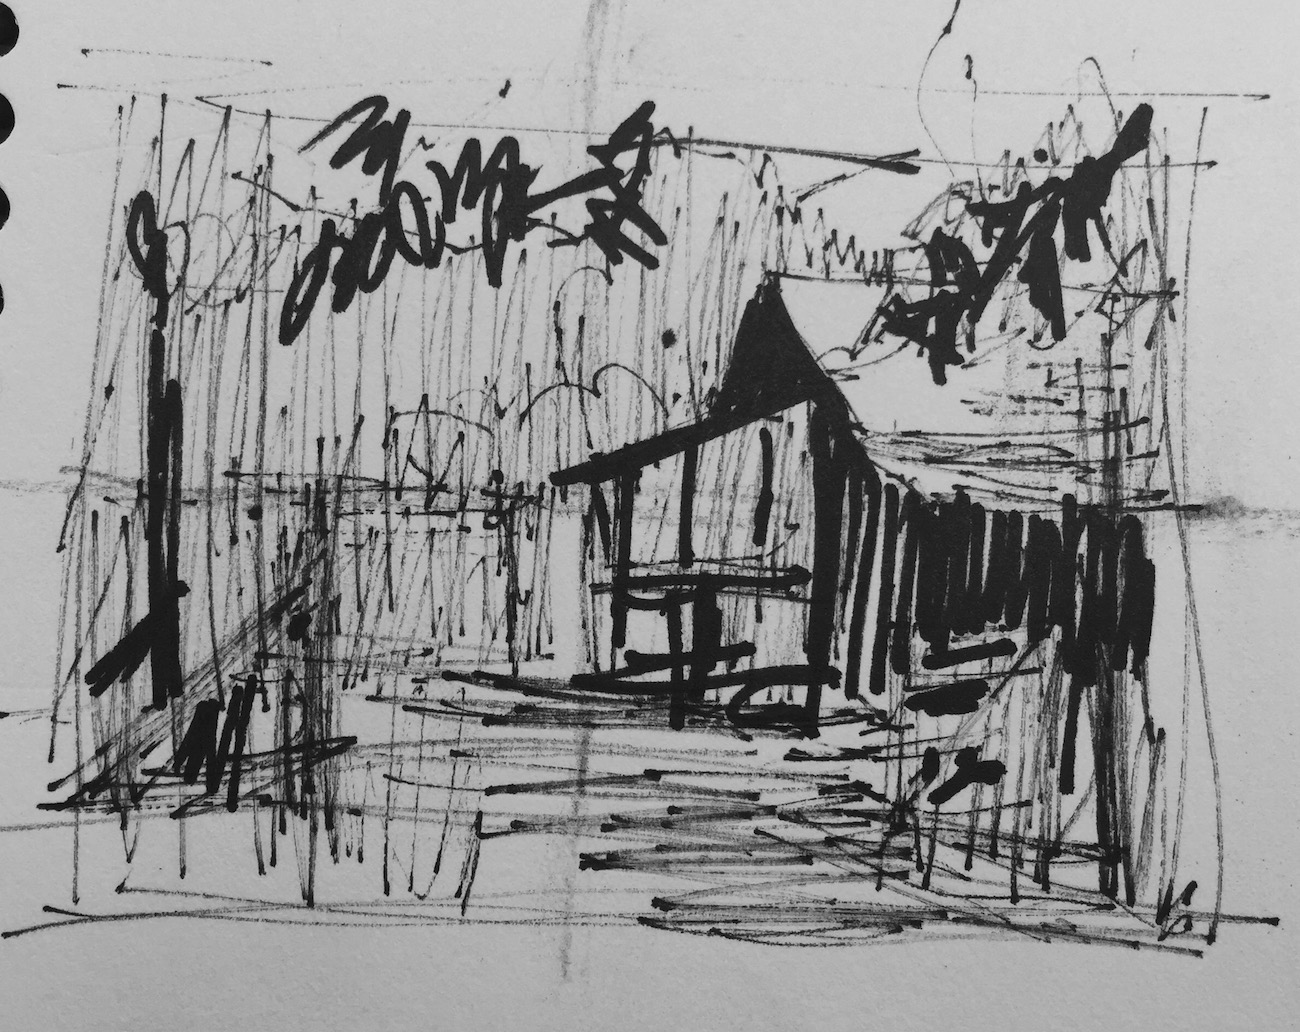
I drew up the design quickly in vine charcoal on Wallis paper (yes, I still have a few sheets!) then began applying pastels.


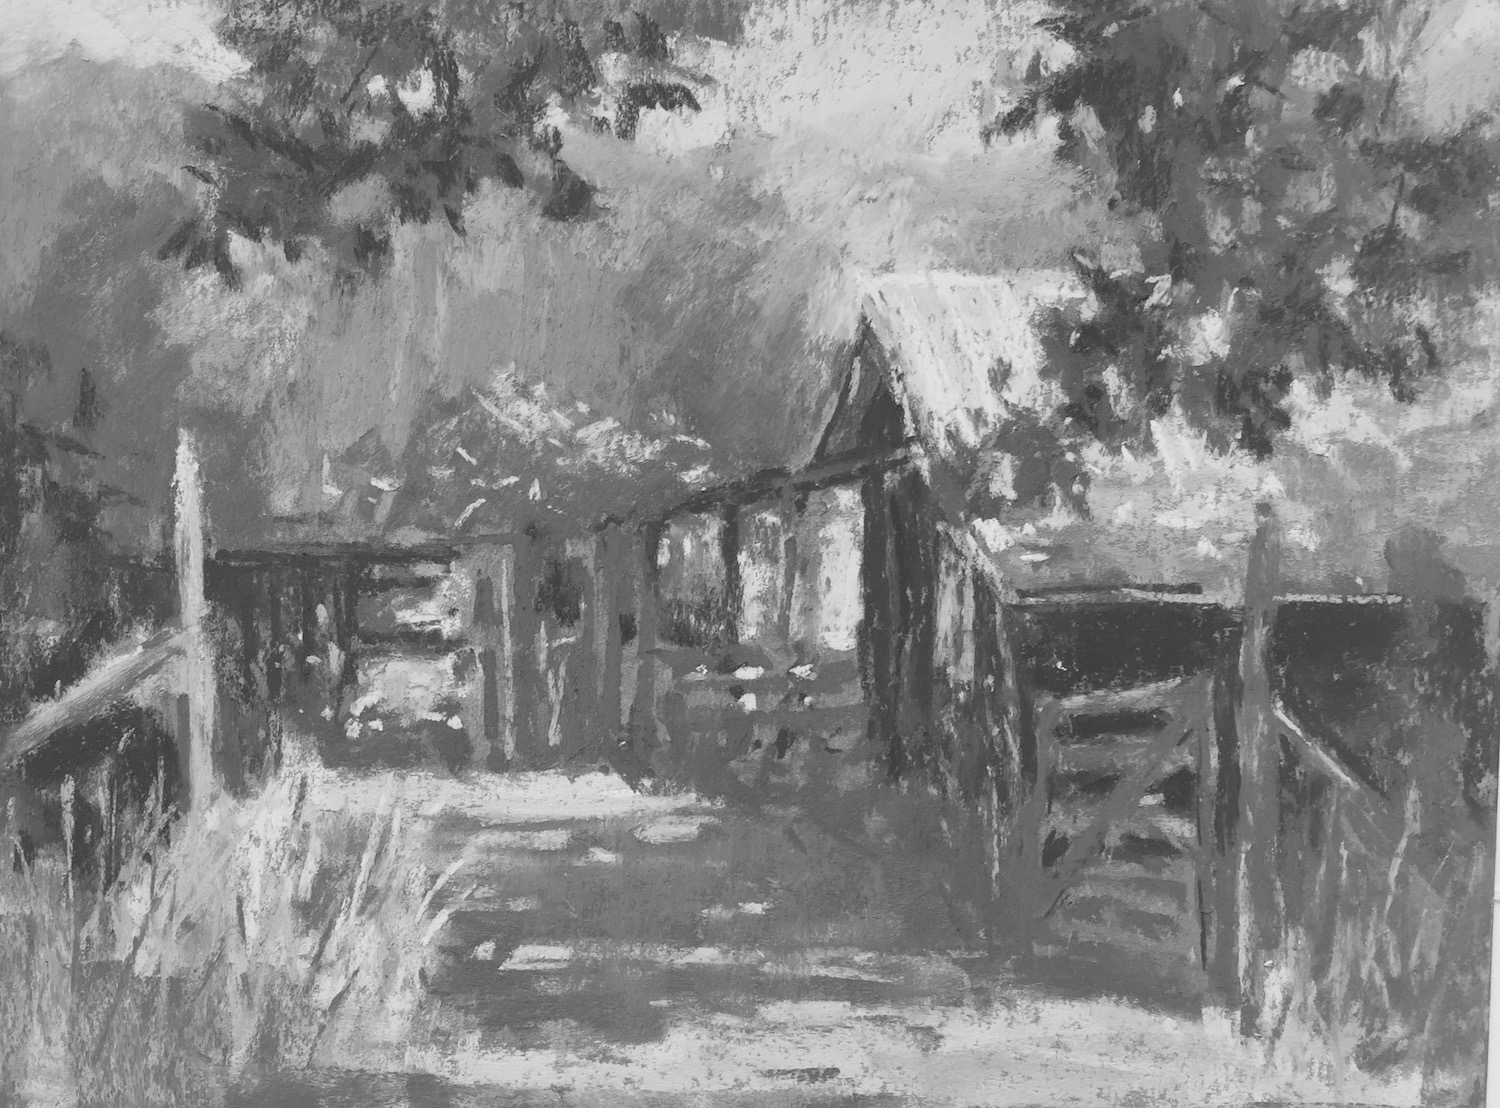
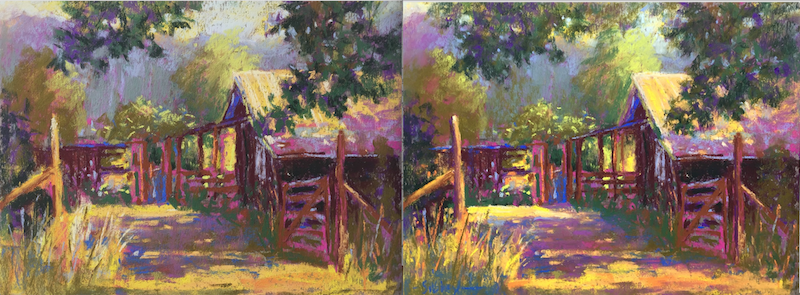
Tweaking My Plein Air Painting
A few days later, back in the studio, it was time to think about tweaking my plein air painting. I had a quiet long look at it and decided on these changes:
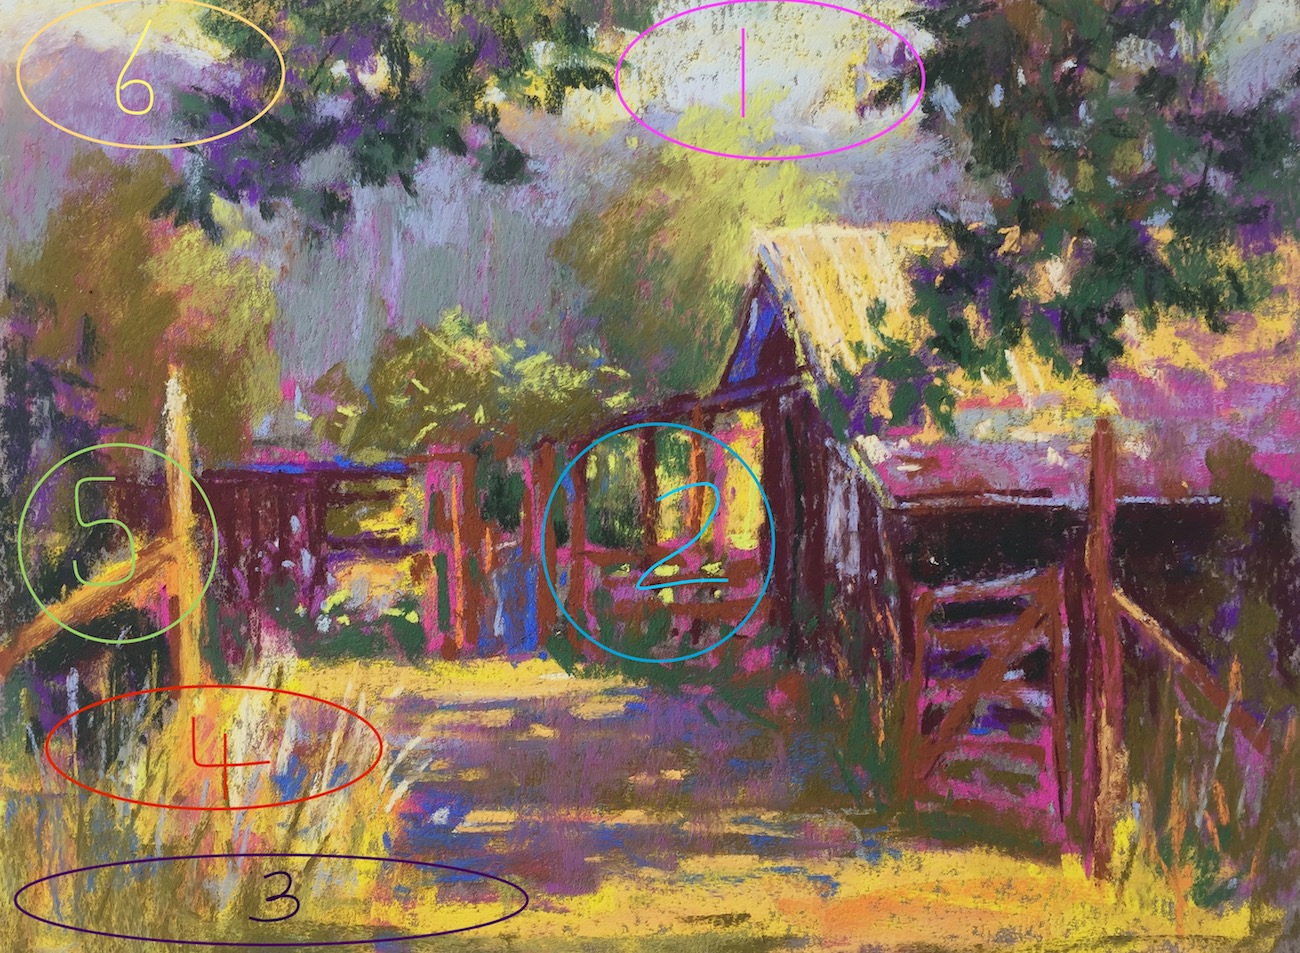
- This space between the tree branches worried me. I felt my eye was getting stuck here in the brightness of the sky so decided to fill it in.
- One of the things in my thumbnail is the dark wood of this entryway. Although the light coming through was showing them upas dark, I felt it would be better if they tied in with the darkness of the building more.
- Although I started putting in the idea of a shadow (which was barely there in real life), I thought it would be better to strengthen it, including the shadow cast on the road.
- I wanted to bring the eye around the painting and that wasn’t happening. So I decided to work a bit more on the grass and include dark and light lines.
- The area behind the fence seemed a bit of an afterthought so I wanted to give some attention to that and in doing so, help the eye finish its route around the painting.
- This corner seemed unsatisfactory to me.
- I forgot to add this one to the annotated image but decided that the right hand corner was drawing my eye too much too so covered the area in leaves.
Tweaking my plein air painting meant trying to balance the finesse of studio work with the fresh look achieved working en plein air. Retaining the vitality of on location work is a tricky thing to do especially without practice, and I felt rusty!
I made the tweaks listed above as well as a number of other small ones. I can see a couple of other things I’d like to tweak but sometimes you just have to let go and say, That’s it!


This was such a delightful two hours! And it was especially wonderful to go trekking out with my lovely parents. I love that we all make our own creations in silence and then afterwards, reconnect to discuss our experiences and work. Nothing like it!! It doesn’t matter, in the end, how a painting turns out. Instead, what counts is the process of painting, the journey, the experience of the environment around you. Wonderful!!
Now I’d love to hear from you! Do you paint en plein air? And about tweaking my plein air painting, what are your thoughts? Do you work on your plein air pieces back in the studio or are you a strict plein air-ist?
Until next time!
~ Gail
PS. In only one week, Cam and I will be on our way to Croatia!! We have a few days in Zagreb then make our way to the Istrian Peninsula, eventually ending in Poreč where the workshop will take place first week in September. Want to know more about it? Click here.
And just a reminder, I will be teaching in Spain early May 2018. For more info, click here.


![Pastels on black aper: Gail Sibley, "Untitled [at this point], Mount Vision pastels on Sansfix pastel card, 5 1/2 x 7 3/4 in](https://www.howtopastel.com/wp-content/uploads/2016/04/IMG_9649-2-150x150.jpeg)


50 thoughts on “Tweaking My Plein Air Painting In The Studio – How I Did It”
Gail-
GREAT post and painting! Really enjoyed the “progress” photos and LOVE your color pallet…very ambitious but I think it “made” the painting a success.
Have a great time and workshop in Croatia!
Randall.
Oh Randall, thanks for such a positive response to my post and painting. Made my evening!!
Thanks for the good wishes. Look forward to reporting the experience 🙂
loved this post of tweaking your painting. Thank you. The progress pics were very informative.
Enjoy your workshop.
Thanks so much Anne! I sometimes wish I would remember to take more progress shots. On the other hand, sometimes the change is minimal and there’s hardly any change to see in the photo!
In plein air I am finding my lights and darks never look the same in the studio as they do outside. But looking at a photo after working outside also indicates how much I am missing by using a photo. The color and light outside is so much more vibrant. I appreciate your post. It is very helpful to see the changes and the thought process behind them! Thank you.
So glad you enjoyed this post Priscilla. Working outside really allows you to see so much more than what’s available in a photo. That goes for subtlety of values as well as colour. Of course this can be overwhelming and challenging hence the need to simplify! Thanks for your comment 🙂
Hi Gail…
What a wonderful choice of subject and beautiful color……I would love to venture into the scene and discover the sweet mystery of it all….
Wishing you safe travels and wonderful experiences in Croatia….
Mosart
Hi Mosart, I’m so happy to hear your response to the scene and colour – so poetic!
Thanks for your good wishes for my Croatia trip!
I love painting pastels “En Plein Air”. In fact I belong to a group that goes out once or twice a month.
Right now I have a pastel on my board that, like yours, needs to be tweaked at home. I find that going out gives you the ability to feel the painting. Was is warm? Was it cloudy or clear? Once you remember the feeling it is much easier to complete those areas that need to be fixed.
Loved the colors in your paintings, so beautiful. I think I am still too timid to try those bright vivacious colors.
There’s nothing like going out with a group en plein air. Love that you do this! Do you go out all year round I wonder? I’m a bit of a fair weather plein air artist myself. You are so right about how recalling the outdoor experience can help when it comes to tweaking. Which is why it’s better to do this sooner than later!
Hope this post will give you the motivation to try some bright colours!
Thanks for your addition to this conversation on plein air.
Love the painting – love the post – love the inspiration and the education. A timely reminder about value and tones for me.
Ahh Glenda, your comment warms my heart. Thank you 🙂
Love that the post came at a good time regarding values!
This is such an inspirational post and I love the freshness and light you’ve captured. I have a little suggestion, would it be possible to place the two paintings side by side so we can see how your tweaks have worked? Thanks.
Love that you find it inspiring Alison!! Great suggestion. That’s something I usually do but totally forgot this time so thank you!! And DONE 😀
Hi, Gail! This is such a helpful post. It is so difficult to critique one’s own work, but you are able to analyze and tweak the painting in just the right places. I find letting a painting rest for a day or so helps me to do that, but I still miss things. Thank you!
I’m so glad you found it helpful Jane. I agree, critiquing one’s own work is tough! As you say, leaving it for a day or so helps. As does looking at it in black and white. Also checking it in the mirror will show up a few things too. Stepping far back helps too.
Lovely colors, lovely painting! So great that you can share the experience with your mother, my daughter & I have the pleasure of many painting getaways , creating paintings & memories.
Thanks Mary! Painting out together as a family has such strong memories for me. I think it’s the time spent in a place while you paint that helps to cement the experience in the memory banks! Glad you have some wonderful paint getaways with your daughter too.
What a beautiful painting… love the colors, and values you used. So helpful to take those black and white photos of your work as you went along. Also your changes in the studio where spot on!
Just wonderful. Have a great time in Croatia.
Gisela so happy to hear your enthusiastic response to my painting. And glad you think the tweaks worked! yes, black and white photos help but really, for me, it’s always checking the thumbnail that keeps me on track!
I really enjoyed reading this article. So much fun!! I love Plein air painting – would much rather be outside than in the studio. This year I’m going to venture out in winter.
Your painting is beautiful. I loved the vibrancy. And how cool that you went with your mom and dad. That is special.
Susie
Susie delighted you liked the article and the painting. There is something about working on location isn’t there? And good for you going out in winter – one of those brave plein air souls!
And yes, going out with my Mum and Dad is very special.
Beautiful painting Gail – i love how you’ve used brighter colours that weren’t really there! Looking at the image in black and white as you go along is an inspiration to me, so thanks for pointing that out here. i will certainly use that next time I’m outside (and in the studio as well probably). Really helps with those tonal values. Thankyou.
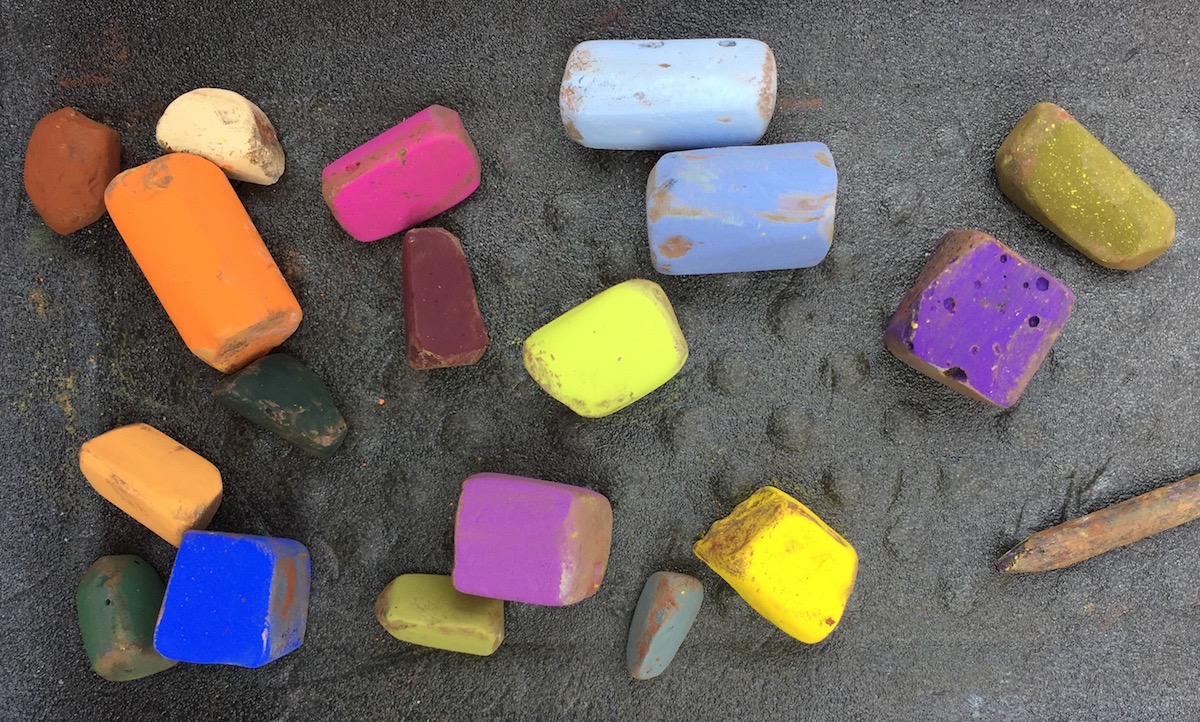
Many thanks Joanne. My collection of pastels is pretty bright so that’s what I use (oh and yes, I love colour!). It’s all about understanding those dang values. With that, you really can go anywhere with colour! Glad the black and white photo idea is helpful. As is referring back to your 3-4-value thumbnail.
Thank you for your post on “tweaking”. This word is unknown to me as I live in Belgium and have never attended art class in the States. I learn at lot from all your entries. I want to thank you.
Please explain a bit more what is tweaking?
I wish you the best experience in Croatia. The country is beautiful and Istria is much like Italy. Don’t miss Pula and Rovinj 💜
So happy to hear you learn from what I offer Margareth!
Okay, about tweaking. It means making minor alterations. I use the word in terms of making a small adjustment or two – some fine tuning – that will make the painting better. I think it has British origins which may be why I use it (being from Jamaica with all its English influences).
I’ll be teaching in Poreč and so definitely plan on a visit to Rovinj and Pula. Can’t wait!!
Great inspiration! After reading your post I packed up my pastels and headed out to paint. Your post and those wonderful pictures (including that wonderful one of you and your Mom) helped break my painters block, so I thank you very much!
I LOVE hearing that Helen!!That’s pretty special to know this post cracked through your painter’s block. Getting started back into painting is always the most difficult thing. Hoping you’re on a roll now!
Love your style!! Great painting. The colors are wonderful!! Best of times in Croatia!! Thanks Gail!!
Many thanks Ruth!!!
I am so looking forward to Croatia (although in a bit of a panic trying to get life organized before leaving and prepping for the workshop!).
I loved seeing your thought process about tweaking…this taught me a lot. We’ve been on vacation and will be busy till next week–but then, watch out! I am ready to get back in the groove and start making art every day. Thank you for all that you continually give us, Gail!
Super knowing that my tweaking thoughts were helpful Wendy. And love your energy towards getting back in the painting groove. You’ll be all primed and ready for October’s 31 paintings in 31 days challenge!
I like the use of violet as shadows. Trying to get away from local colour is something I find challenging. Overall, I like the way you handled the yellows and down played the greens. Well done.
Thanks Cliff! Sometimes trying to see another colour other than the local colour or picking a colour of different temperature for the first layer helps.
LOVE this painting, Gail!! The subject, the composition, the COLOUR!!! But what I loved the best with your post is comparing your thumbnail to your finished B&W photo… the Ah Ha moment! Values are so hard for me, but this illustrated it fabulously! Bringing my pastels to China Beach on Sunday for some pleine air… I will practice my value studies!! Thank you, thank you!. Have fun/success on your trip!
Wow THANKS Teri. And whoo hoo on the aha moment!! That just gave me goose bumps! I’m glad you can see how the value sketch can carry you through the whole process and keep you on track. Look forward to hearing how your outing goes!
Wonderful pastel, Gail! Love your progression. I understand how important tweaking is to a plein air study. It’s what makes a good painting that counts! Today I painted in gouache, my plein air group teased me into going to lunch (comaraderie is sweet) so I had to finish painting later in studio. Glad I did while visual memory was still vivid. I also love painting plein air in pastels and oils! Finishing while focusing in the studio is an important step. Sometimes… they DO finish themselves in the field and that is a great joy. Thank you for you inspiring blog!
Diane thank you for your lovely sharing! How wonderful to go out painting with a plein air group, one that obviously has fun together! And love that you paint in many media on location – wow!
Very informative post. Thanks for all the step by step pictures as well as the thought process behind your decisions. I love the play of the purples and blues in the scene, they dance with the greens and yellows!
Thanks Laura! Love that you use the word ‘dance’ in your description since dancing is part of who I am 🙂
Loved your colours, it does help a lot looking at it in black and white, gets the values into propective. I too have the luck to have a son whois a profesional painter andteacher, what patience he has with his old mum!!!
Yes – values values values! If you have been following me, you know how I love to hammer that in 🙂 And lucky you to have a son who is a professional artist who will share his knowledge with you. I am so happy I have sharing back and forth with my Mum and Dad!
Wonderful painting Gail! Love your use of colour. I wonder if you could do something on picking the best paper or support for the style of painting, subject matter and pastel type. This is what I struggle with the most, hands down! Sometimes I use other media simply because I know I can put down what I like and get to completion. Have fun overseas, and congratulations on your book, Jane Chorlton.
Thanks so much Jane! Please email me with more details about your question so I can fully understand what you are asking because I’d love to answer it.
Hi Gail,
I loved how you showed us this process. It helped me appreciate what can seem like a mundane scene to my eyes – yet under a watchful gaze, colours and feelings emerge through the creative process. You’ve captured that so eloquently. By the way, might you have a print for sale of “Shepherd Hills Hideaway”? I’d love a momento to remind me of the feelings I felt as I followed along your blog and was reminded of the importance of my own creative engagement with the world… And, of course, is it going to be for sale somewhere (I can always dream!!). Thanks again!
Julia, I love that you have received through the work the feeling of my painting experience – the perfect day finding something that captured my eye (design, light, mystery), painting it, and spending time in the company of my parents. To answer your questions, yes the original is for sale, and good question about the print! I think I can make that happen 😊
I cannot tell you how beneficial the process that you’ve demonstrated is! The step by step progression of thoughts and then seeing each of those put down on paper, was so helpful. It was like you were right here in person instructing me and then showing me. You gave the what, the how, and the why of each step. The final before and after was great. I’m only 1 yr into pastels, which I’m learning “on my own” by watching yours and others’ videos. I’m so thankful that professional artists, like yourself, are willing to give their time and effort to share their knowledge freely! I’ve always wanted to learn to draw realistically since I was a kid. Because of family, time, and money, I wasn’t able to. Two yrs. ago I took a college drawing course ( retired last yr), and boy did that awaken that sleeping passion. It was a long time in coming! No, I haven’t tried plein air yet. Thank you again for your videos. One day, maybe I’ll be able to paint as loose as you. I’m working on it.
Judy it always makes my day reading that my explanations and photos of the process and helpful. Thank you for your enthusiastic comment! So glad you’ve jumped and started taking drawing lessons. Drawing really is the foundation on which to build creating in visual art. And of course I’m very happy you’ve discovered pastels 😊
Hi Gail!
Thank you so much for your inspiring step- by- step -NOTa lesson…more like a conversation with the painting, it’s like hearing you talk as you go and it makes the whole thing so lively and unpretending. Though I’m just a beginner and often feel frustrated, I do appreciate your newsletter : fact is, it’s the first thing I read in my mails!Thanks again.
PS Hope you don’t mind if I use your works as my wallpaper?
Dom. from Lyon
Hi Dom, Thanks for the big compliment of reading my emails first!! And thank you for your kind words. And for using my images as computer wallpaper!
I love that you think of what I wrote more as a conversation – with the painting and YOU!
Thanks for writing 🙂